DomainKeys Identified Mail (DKIM) adds a layer of security to your outgoing email by attaching a digital signature. This helps receiving servers verify that the email hasn’t been altered and really came from your domain — improving deliverability and protecting your reputation.

Follow these steps to enable DKIM:
🛠 Step 1: Log in to the Email Control Panel
If you're not already logged in, follow this guide: 👉 How to Access Your Email Control Panel
🌐 Step 2: Select Your Domain
From the dashboard, click on the domain you want to enable DKIM for. This will take you to its settings page.
⚙️ Step 3: Go to Settings
Click on the Settings tab for your domain.
✅ Step 4: Enable DKIM
-
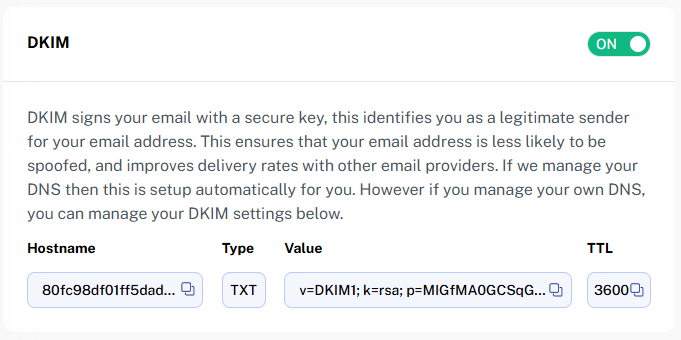
Scroll to the DKIM section.
-
Toggle the switch to ON.
Once enabled, the system will automatically generate a DKIM DNS record...
🧾 Step 5: Add DKIM Record to Your DNS (If Required)
If you manage your own DNS (not using our name servers), you’ll need to manually add the DKIM record.
The record information is provided on the DKIM screen and can be copied by clicking the icon next to each field.
💡 If we manage your DNS, this record is added automatically.
📬 What Happens Next?
Once the DKIM record is active and propagated, your outgoing emails will be signed with your domain's private key — allowing recipients to verify the message came from your domain.
✅ Done!
You've successfully enabled DKIM. Your domain is now better protected against spoofing, and your emails are more likely to land in inboxes — not spam folders.